We offer Same Day Smile services for our CEREC doctors. Our smile designer will go into your dental office and customize a beautiful smile for your patient to be delivered all in one day.
Call us to get more details on how to schedule Same Day Smile services in your office.
Step 1: Intraoral Scanning
Perform a full digital scan including:
Step 2: Export or Share the Digital Scan
Choose “Send to Lab” or “Export Case” depending on your scanner system:
.STL, .PLY, or proprietary file formats are typically used..dxd file.
Step 3: Create a Digital Rx Form
Include the following on the digital lab prescription:
.STL, .CEREC design)
Step 4: Upload and Send to the Lab
Use your scanner’s integrated lab portal or your lab’s preferred submission method.
Preliminary Intraoral Scans are taken before implants are placed to start the treatment planning process.
Scan the maxillary and mandibular full arches. Be sure to capture edentulous ridges and any remaining teeth. Use tissue retraction for clear soft-tissue capture. Capture a bite scan (buccal bite) ensuring the patient is in centric occlusion.
Tip: For edentulous scans, use scanning powder or a scan appliance if needed for better data capture, depending on your scanner.
If the patient has a current denture, place a light body material on internal surface (temporary reline) to capture details. Scan the complete denture alone/extraorally as a reference.
For edentulous arches, some scanners work better with a scanning prosthetic or scan appliance to improve accuracy.
Please send the following photos via email to crowndsd@gmail.com:
Be sure to include Doctor/Office name and patient name.
Once email and scans are received, we will contact you to review any specific requests or treatment plan needs.
Select the correct scan body for the Implant brand (e.g., Nobel, Straumann, Zimmer, etc.).
Seat the scan body fully and correctly, confirm full seat with an xray.
Dry the area before scanning. Ensure the scan captures scan body clearly and completely. Includes adjacent teeth. Has no voids or reflections on the scan body. Captures full gingival contour around implant. The scan body geometry must be sharp and complete.
Remove the scan body and rescan surrounding tissue for emergence profile. Replace the healing cap.
Complete Tooth Preparation ensuring smooth, well-defined margins.
Provide adequate reduction based on crown material. Control bleeding and moisture using hemostatic agents, retraction cords, or lasers. Isolate with cotton rolls, dry angles, or a cheek retractor.
Focus on clearly capturing all finish lines/margins. Ensure adjacent and opposing teeth are fully scanned. Good bite registration helps show occlusion.
Inspect for clear, bubble-free margins. No scan holes or artifacts. Ensure accurate occlusion alignment. Rescan any poor areas (most software highlights trouble spots).
Enter the crown details, including:
Step 1: Open the email from CEREC and download the attached file.
Step 2: Open the CEREC software and click on the DS logo in the upper left corner to select the import option.
Step 3: Select Downloads, then double-click on the file recently downloaded from the email. The case is now imported and ready for milling.
Step 1: Take detailed digital intraoral scans of the patient’s upper arch, lower arch and bite using a 3D scanner. Ensure margins are visible and clear of any debris.
Step 2: If the case involves anterior teeth, take a head-on portrait photo of the patient while they are smiling. If the lower lip covers the upper front teeth, kindly ask the patient to open their mouth slightly until the upper front teeth are visible. This is important to ensure we can see the existing incisal edge in relation to the rest of the face.
Step 3: Record any specific clinical details or functional requirements as well as desired shade.
Step 4: Download and send the patient photo by email to crowndsd@gmail.com. Be sure to identify the Doctor or office sending the case, the patient name, and any contact details in the email to identify the case.
Step 1: Take a head-on portrait photo of the patient while they are smiling. If the lower lip covers the upper front teeth, kindly ask the patient to open their mouth slightly until the upper front teeth are visible. This is important to ensure we can see the existing incisal edge in relation to the rest of the face.
Step 2: Take detailed intraoral scans of the patient’s upper arch, lower arch and bite using a 3D scanner.
Step 3: Upload the digital scans of the patient’s arches and bite along with any clinical notes to the lab’s secure digital platform.
Step 4: Note any specific requests regarding design or functional requirements.
Step 5: Download and send the patient photo by email to crowndsd@gmail.com. Be sure to identify the Doctor or office sending the case, the patient name and any contact details in the email to identify the case.
Step 1: Evaluate the patient’s need for a custom tray, typically for taking final impressions for dentures, crowns, bridges, or other prosthetic work.
Step 2: Use an intraoral scanner to capture high-quality digital impressions of the patient’s arches. Ensure all necessary areas for the prosthesis are scanned, including hard-to-reach areas like the palate and retromolar pad.
Step 3: Note any specific tray requirements, such as special spacing for impression materials or handles for easier patient use.
Step 4: The dentist uploads the digital scans of the patient’s arches along with any clinical notes and specific tray requests (e.g., handle position) to the lab’s secure digital platform.
Step 5: The dentist confirms the case is for a custom tray and indicates the intended use (e.g., for denture final impression, implant prosthesis, etc.).
Step 1: Assess the patient’s need for an anterior deprogrammer or day/night splint, typically for managing temporomandibular joint (TMJ) disorders, bruxism, or occlusal issues.
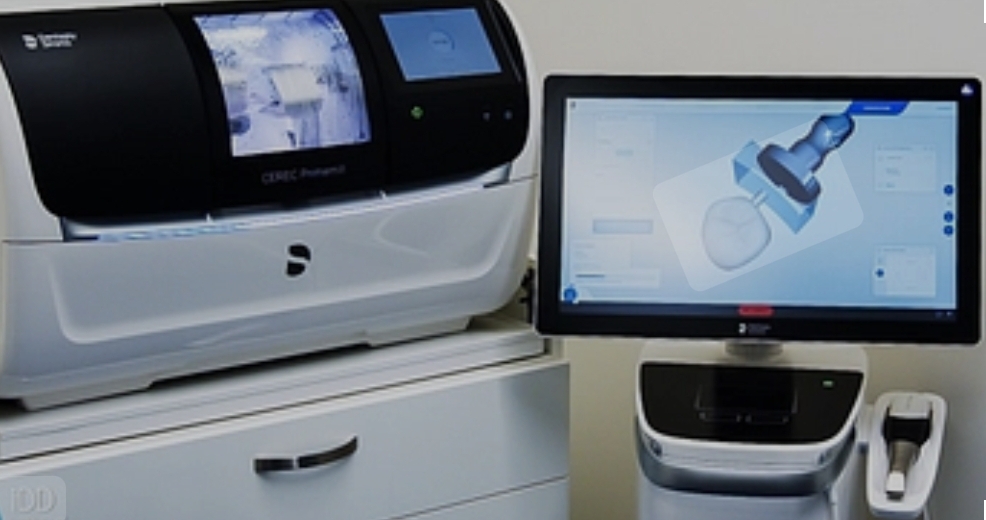
Step 2: Take detailed digital intraoral scans of the patient’s upper and lower arches using a 3D scanner, capturing the occlusion and specific areas of interest.
Step 3: Record any specific clinical details, such as desired vertical dimension, occlusal contact points, or any other functional requirements.
Step 4: Take protrusive measurements to ensure the anterior deprogrammer or day/night splint is designed to allow for proper anterior guidance and prevent excessive protrusion.
Step 4a: Instruct the patient to move their mandible into a protruded position, typically about 3–5 mm beyond the centric occlusion.
Step 4b: Use a protrusive gauge or measure the distance manually between the incisal edges of the upper and lower incisors in the protruded position.
Step 4c: Record this measurement and include it in the clinical notes or upload it with the digital scans (can optionally scan bite in this position).
Step 1: Conduct an evaluation of the patient’s need for an occlusal nightguard, assessing for issues such as bruxism, TMJ, or bite misalignment.
Step 2: Capture digital intraoral scans of the patient’s upper and lower arches using a 3D scanner, ensuring all occlusal surfaces are accurately recorded.
Step 3: Use a Leaf Gauge to separate the patient’s front teeth to the desired position and opening. You may also place a cotton roll on the left and right sides of the mouth and have the patient bite down firmly into their natural biting position. Scanning the bite in this position allows for minimal adjustment upon delivery.
Step 4: Scan the left and right side of the bite in this position for the most accurate occlusion.
Step 5: Upload the intraoral scans, bite registration, and any relevant patient notes (e.g., specific occlusal adjustments, material preferences) to the lab’s secure digital platform.
Step 6: Specify the type of nightguard required (e.g., hard, comfort).